1、前言 在嵌入式Linux开发中,对嵌入式SoC中的GPIO进行控制非常重要,Linux内核中提供了GPIO子系统,驱动开发者在驱动代码中使用GPIO子系统提供的API函数,便可以达到对GPIO控制的效果,例如将IO口的方向设置为输入或输出,当IO口的方向为输入时,可以通过调用API函数获取相应的IO口电平,当IO口设置为输出方向时,可以调用相关的API函数去设置IO口电平,本文将简单描述如何去使用Linux内核中GPIO子系统的API接口。
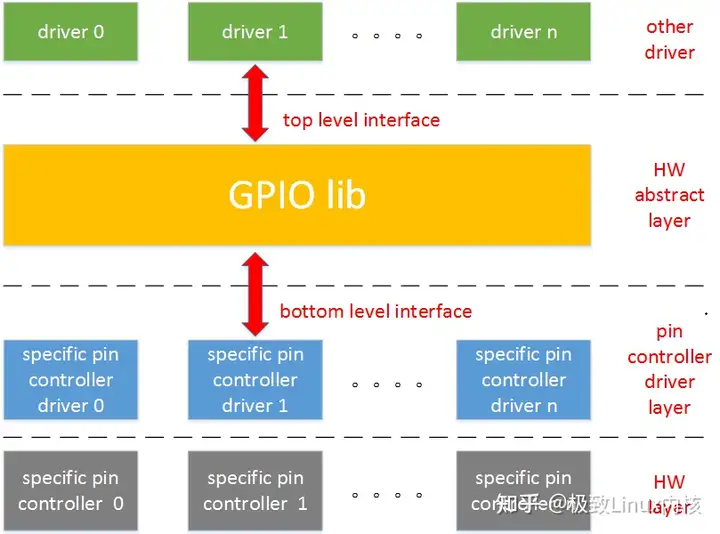
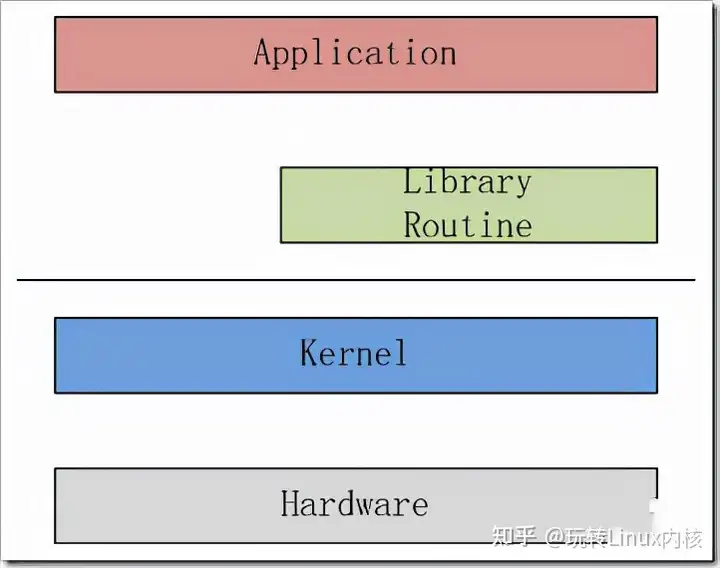
下图是Linux内核中GPIO子系统的软件驱动分层图:
2、常用API接口 当我们在驱动代码中要使用内核中提供的GPIO子系统,需要在驱动代码中包含<linux/gpio.h>头文件,另外,关于API接口函数的实现在内核源码drivers/gpio/gpiolib.c文件中,关于GPIO子系统的使用说明文档为Documentation/gpio.txt,该文档具有更详细的使用说明,接下来,将简单介绍一下常用的API接口。
1
2
3
4
5
6
7
8
9
10
11
12
/* * "valid" GPIO numbers are nonnegative and may be passed to * setup routines like gpio_request(). only some valid numbers * can successfully be requested and used. * * Invalid GPIO numbers are useful for indicating no-such-GPIO in * platform data and other tables. */ static inline bool gpio_is_valid(int number) { return number >= 0 && number < ARCH_NR_GPIOS; }
函数gpio_is_valid()用来判断获取到的gpio号是否是有效的,只有有效的gpio号,才能向内核中进行申请使用,因此,当我们从设备树的设备节点获取到gpio号,可以使用该函数进行判断是否有效。
1
2
3
4
5
/* Always use the library code for GPIO management calls, * or when sleeping may be involved. */ extern int gpio_request(unsigned gpio, const char *label); extern void gpio_free(unsigned gpio);
上面这两个函数用来向系统中申请GPIO和释放已经申请的GPIO,在函数gpio_request()中传入的形参中,gpio为IO号,label为向系统中申请GPIO使用的标签,类似于GPIO的名称。
1
2
3
4
5
6
7
8
9
10
11
/** * struct gpio - a structure describing a GPIO with configuration * @gpio: the GPIO number * @flags: GPIO configuration as specified by GPIOF_* * @label: a literal description string of this GPIO */ struct gpio { unsigned gpio; unsigned long flags; const char *label; };
结构体struct gpio用来描述一个需要配置的GPIO。
1
2
3
extern int gpio_request_one(unsigned gpio, unsigned long flags, const char *label); extern int gpio_request_array(const struct gpio *array, size_t num); extern void gpio_free_array(const struct gpio *array, size_t num);
上面的3个函数也是用来向系统申请或者释放GPIO资源,函数gpio_request_one()用来申请单个GPIO,但是在申请的时候可以设置flag标志,例如,该函数在申请GPIO资源的同时,直接将GPIO的方向设置为输入或者输出,函数gpio_request_array()和gpio_free_array()用来向系统中申请或者释放多个GPIO资源。
1
2
3
4
5
6
7
8
/* CONFIG_GPIOLIB: bindings for managed devices that want to request gpios */ struct device; int devm_gpio_request(struct device *dev, unsigned gpio, const char *label); int devm_gpio_request_one(struct device *dev, unsigned gpio, unsigned long flags, const char *label); void devm_gpio_free(struct device *dev, unsigned int gpio);
上面的3个函数也是用来向系统申请或者释放GPIO资源,但是函数带有devm_前缀,也就是说,这是带设备资源管理版本的函数,因此在使用上面的函数时,需要指定设备的struct device指针。
1
2
3
4
5
6
7
8
static inline int gpio_direction_input(unsigned gpio) { return gpiod_direction_input(gpio_to_desc(gpio)); } static inline int gpio_direction_output(unsigned gpio, int value) { return gpiod_direction_output_raw(gpio_to_desc(gpio), value); }
当我们使用gpio_request()函数向系统中申请了GPIO资源后,可以使用上面的函数进行GPIO的方向设置,函数gpio_direction_input()用来设置GPIO的方向为输入,函数gpio_direction_output()用来设置GPIO的方向为输出,并且通过value值可以设置输出的电平。
1
2
3
4
5
6
7
8
9
static inline int gpio_get_value(unsigned int gpio) { return __gpio_get_value(gpio); } static inline void gpio_set_value(unsigned int gpio, int value) { __gpio_set_value(gpio, value); }
当我们将GPIO的方向设置为输入时,可以使用上面的函数gpio_get_value()来获取当前的IO口电平值,当GPIO的方向设置为输出时,使用函数gpio_set_value()可以设置IO口的电平值。
1
2
3
4
static inline int gpio_cansleep(unsigned int gpio) { return __gpio_cansleep(gpio); }
使用函数gpio_cansleep()判断是否能处于休眠状态,当该函数返回非零值时,说明读或写GPIO的电平值时能够处于休眠状态。
1
2
3
4
5
6
7
8
static inline int gpio_get_value_cansleep(unsigned gpio) { return gpiod_get_raw_value_cansleep(gpio_to_desc(gpio)); } static inline void gpio_set_value_cansleep(unsigned gpio, int value) { return gpiod_set_raw_value_cansleep(gpio_to_desc(gpio), value); }
上面的函数同样是获取或者设置GPIO的电平值,只不过是带休眠版本的函数。
1
2
3
4
static inline int gpio_to_irq(unsigned int gpio) { return __gpio_to_irq(gpio); }
函数gpio_to_irq()用于将当前已经申请GPIO号转换为IRQ号,也就是获取当前GPIO的中断线,函数调用成功后,将返回对应的IRQ号。
以上就是Linux内核中GPIO子系统的常用的API接口,关于其代码的实现,可以进一步分析Linux内核源码。
3、实例说明 在上面,已经分析过了Linux驱动中GPIO子系统的常用API接口函数,接下来,将通过一个具体的实例来讲解GPIO子系统中API接口如何使用。
首先,先了解一下GPIO的使用思路,如下所示:
1
2
3
4
5
6
7
8
9
10
11
12
13
14
15
16
17
18
19
20
21
22
23
24
25
26
27
28
29
30
31
32
33
34
35
36
37
38
39
40
41
42
43
44
45
46
47
48
49
50
51
52
53
54
55
56
57
58
59
60
61
62
63
#include <linux/module.h> #include <linux/init.h> #include <linux/gpio.h> ... struct gpio_drvdata { /* gpio号 */ int gpio_num; ... }; static int __init gpio_init(void) { struct gpio_drvdata *ddata; int ret; ddata = kzalloc(sizeof(*ddata), GFP_KERNEL); if (!ddata) return -ENOMEM; ... /* gpio初始化 */ if (gpio_is_valid(ddata->gpio_num)) { /* 申请gpio资源 */ ret = gpio_request(ddata->gpio_num, "test-gpio"); if (ret) { printk("failed to request gpio\n"); return ret; } /* 设置gpio的方向(输出) */ ret = gpio_direction_output(ddata->gpio_num, 0); if (ret) { printk("failed to set output direction\n"); return ret; } /* 在sysfs中导出gpio(方向能改变) */ ret = gpio_export(ddata->gpio_num, true); if (ret) { printk("failed to export gpio in sysfs\n"); return ret; } /* 设置gpio电平值(高电平) */ gpio_set_value(ddata->gpio_num, 1); } ... return 0; } static void __exit gpio_exit(void) { ... /* 释放已经申请的gpio资源 */ if (gpio_is_valid(ddata->gpio_num)) gpio_free(ddata->gpio_num); ... } module_init(gpio_init); module_exit(gpio_exit);
上面的代码已经很清楚地体现了GPIO的使用思路,当驱动模块加载的时候,需要获取要使用的GPIO号,然后需要向系统申请使用GPIO资源,资源申请成功后,我们需要设置GPIO的方向(输入或者输出),此外,还能使用gpio_export()函数在sysfs中导出GPIO,导出的好处在于可以方便地debug代码,当驱动模块卸载时,需要将已经申请的GPIO资源进行释放掉,基本的使用思路就这样,比较简单。
接下来,给出具体的实例,功能为简单的GPIO控制,驱动程序中嵌入platform_driver框架,另外,在设备节点中导出ctrl和gpio两个属性文件,应用层对ctrl属性文件进行读写操作,能够获取和设置GPIO的电平状态,对gpio读操作,能够获取使用的GPIO号,下面是具体实例的实现过程:
先定义相关的设备节点,如下:
1
2
3
4
5
6
dev_gpio { status = "okay"; compatible = "dev-gpio"; label = "test_gpio"; gpios = <&msm_gpio 68 0>; };
使用了GPIO_68这个引脚,compatible属性的值用于和驱动程序进行匹配,接下来是驱动代码的实现:
1
2
3
4
5
6
7
8
9
10
11
12
13
14
15
16
17
18
19
20
21
22
23
24
25
26
27
28
29
30
31
32
33
34
35
36
37
38
39
40
41
42
43
44
45
46
47
48
49
50
51
52
53
54
55
56
57
58
59
60
61
62
63
64
65
66
67
68
69
70
71
72
73
74
75
76
77
78
79
80
81
82
83
84
85
86
87
88
89
90
91
92
93
94
95
96
97
98
99
100
101
102
103
104
105
106
107
108
109
110
111
112
113
114
115
116
117
118
119
120
121
122
123
124
125
126
127
128
129
130
131
132
133
134
135
136
137
138
139
140
141
142
143
144
145
146
147
148
149
150
151
152
153
154
155
156
157
158
159
160
161
162
163
164
165
166
167
168
169
170
171
172
173
174
175
176
177
178
179
180
181
182
183
184
185
186
187
188
189
190
191
192
193
194
195
196
197
198
199
200
201
202
203
204
205
206
207
208
209
210
211
212
213
214
215
216
217
218
219
220
221
222
223
224
225
226
227
228
229
230
231
232
233
234
235
236
#include <linux/module.h> #include <linux/init.h> #include <linux/of.h> #include <linux/of_gpio.h> #include <linux/platform_device.h> #include <linux/kernel.h> #include <linux/slab.h> #include <linux/errno.h> #include <linux/gpio.h> #include <linux/sysfs.h> struct gpio_platform_data { const char *label; unsigned int gpio_num; enum of_gpio_flags gpio_flag; }; struct gpio_drvdata { struct gpio_platform_data *pdata; bool gpio_state; }; static ssize_t ctrl_show(struct device *dev, struct device_attribute *attr, char *buf) { struct gpio_drvdata *ddata = dev_get_drvdata(dev); int ret; if (ddata->gpio_state) ret = snprintf(buf, PAGE_SIZE - 2, "%s", "enable"); else ret = snprintf(buf, PAGE_SIZE - 2, "%s", "disable"); buf[ret++] = '\n'; buf[ret] = '\0'; return ret; } static ssize_t ctrl_store(struct device *dev, struct device_attribute *attr, const char *buf, size_t count) { struct gpio_drvdata *ddata = dev_get_drvdata(dev); bool state = ddata->gpio_state; if (!strncmp(buf, "enable", strlen("enable"))) { if (!state) { gpio_set_value(ddata->pdata->gpio_num, !state); ddata->gpio_state = !state; goto ret; } } else if (!strncmp(buf, "disable", strlen("disable"))) { if (state) { gpio_set_value(ddata->pdata->gpio_num, !state); ddata->gpio_state = !state; goto ret; } } return 0; ret: return strlen(buf); } static DEVICE_ATTR(ctrl, 0644, ctrl_show, ctrl_store); static ssize_t gpio_show(struct device *dev, struct device_attribute *attr, char *buf) { struct gpio_drvdata *ddata = dev_get_drvdata(dev); int ret; ret = snprintf(buf, PAGE_SIZE - 2, "gpio-number: GPIO_%d", ddata->pdata->gpio_num - 911); buf[ret++] = '\n'; buf[ret] = '\0'; return ret; } static DEVICE_ATTR(gpio, 0444, gpio_show, NULL); static struct attribute *gpio_attrs[] = { &dev_attr_ctrl.attr, &dev_attr_gpio.attr, NULL }; static struct attribute_group attr_grp = { .attrs = gpio_attrs, }; static struct gpio_platform_data * gpio_parse_dt(struct device *dev) { int ret; struct device_node *np = dev->of_node; struct gpio_platform_data *pdata; pdata = kzalloc(sizeof(*pdata), GFP_KERNEL); if (!pdata) { dev_err(dev, "failed to alloc memory of platform data\n"); return NULL; } ret = of_property_read_string(np, "label", &pdata->label); if (ret) { dev_err(dev, "failed to read property of lable\n"); goto fail; } pdata->gpio_num = of_get_named_gpio_flags(np, "gpios", 0, &pdata->gpio_flag); if (pdata->gpio_num < 0) { dev_err(dev, "invalid gpio number %d\n", pdata->gpio_num); ret = pdata->gpio_num; goto fail; } return pdata; fail: kfree(pdata); return ERR_PTR(ret); } static int gpio_probe(struct platform_device *pdev) { struct gpio_drvdata *ddata; struct gpio_platform_data *pdata; struct device *dev = &pdev->dev; struct device_node *np = dev->of_node; int ret; printk("[%s]==========gpio_probe start==========\n", __func__); if (!np) { dev_err(dev, "failed to find device node of gpio device\n"); return -ENODEV; } ddata = kzalloc(sizeof(*ddata), GFP_KERNEL); if (!ddata) { dev_err(dev, "failed to alloc memory for driver data\n"); return -ENOMEM; } pdata = gpio_parse_dt(dev); if (IS_ERR(pdata)) { dev_err(dev, "failed to parse device node\n"); ret = PTR_ERR(pdata); goto fail1; } if (gpio_is_valid(pdata->gpio_num)) { ret = gpio_request(pdata->gpio_num, pdata->label); if (ret) { dev_err(dev, "failed to request gpio number %d\n", pdata->gpio_num); goto fail2; } ret = gpio_direction_output(pdata->gpio_num, 0); if (ret) { dev_err(dev, "failed to set gpio direction for output\n"); goto fail3; } ret = gpio_export(pdata->gpio_num, false); if (ret) { dev_err(dev, "failed to export gpio %d\n", pdata->gpio_num); goto fail3; } } ddata->gpio_state = false; ddata->pdata = pdata; platform_set_drvdata(pdev, ddata); ret = sysfs_create_group(&dev->kobj, &attr_grp); if (ret) { dev_err(dev, "failed to create sysfs files\n"); goto fail3; } printk("[%s]==========gpio_probe over==========\n", __func__); return 0; fail3: gpio_free(pdata->gpio_num); fail2: kfree(pdata); fail1: kfree(ddata); return ret; } static int gpio_remove(struct platform_device *pdev) { struct gpio_drvdata *ddata = platform_get_drvdata(pdev); struct gpio_platform_data *pdata = ddata->pdata; sysfs_remove_group(&pdev->dev.kobj, &attr_grp); if (gpio_is_valid(pdata->gpio_num)) gpio_free(pdata->gpio_num); kfree(pdata); pdata = NULL; kfree(ddata); ddata = NULL; return 0; } static struct of_device_id device_match_table[] = { { .compatible = "dev-gpio",}, { }, }; MODULE_DEVICE_TABLE(of, device_match_table); static struct platform_driver dev_gpio_driver = { .probe = gpio_probe, .remove = gpio_remove, .driver = { .name = "dev-gpio", .owner = THIS_MODULE, .of_match_table = device_match_table, }, }; module_platform_driver(dev_gpio_driver); MODULE_AUTHOR("HLY"); MODULE_LICENSE("GPL v2");
实现的思路和前面给出的模板一样,只不过是嵌入了platform_driver这个驱动框架,另外,在设备节点中导出了ctrl和gpio属性文件,便可以很方便地在应用层进行设备的GPIO控制了。
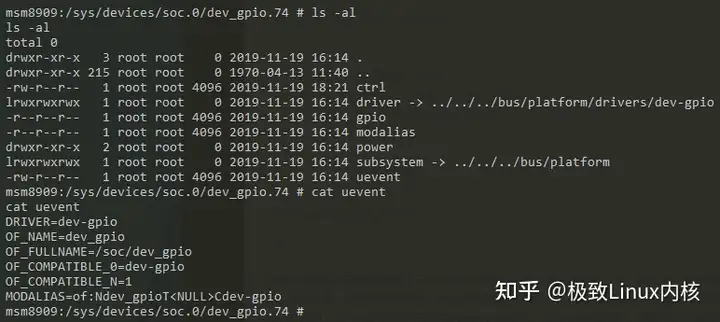
接下来,看看实现的效果,首先是生成的设备节点信息,可以使用下面的命令:
输出如下:
通过uevent可以看到设备节点的路径以及驱动和设备匹配的属性值,此外,在上面图片中,也可以看到ctrl和gpio属性文件已经被成功导出到了该设备节点下面,使用下面的命令可以进行GPIO的控制:
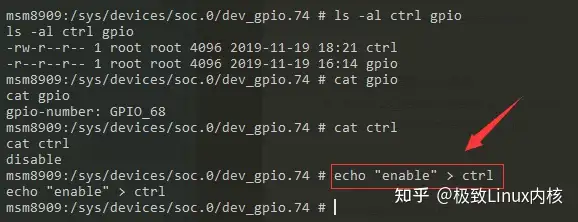
1 2 3 4 5 ##将GPIO置高电平 # echo "enable" > ctrl ##将GPIO置低电平 # echo "disable" > ctrl
控制的效果如下所示:
另外,在驱动程序中,我们使用了函数gpio_export()在sysfs中导出相关的GPIO信息,我们可以到/sys/class/gpio/gpioN目录下查看相关的GPIO信息,如下:
属性文件value保存了当前GPIO的电平值,当我们调用gpio_export()函数时,将第二个形参传入为true时,表示GPIO的方向还能改变,将在上面的目录中生成direction属性文件,里面保存了当前GPIO的方向,我们还能使用echo命令对文件进行写操作,从而改变GPIO的方向。
4、小结 本文简单介绍了Linux中GPIO子系统中的常用的API接口函数,并且给出了驱动程序中使用GPIO子系统的思路,另外还通过一个简单的实例进行说明。
版权声明:本文为知乎博主「极致Linux内核 」的原创文章,遵循CC 4.0 BY-SA版权协议,转载请附上原文出处链接及本声明。
原文链接:https://zhuanlan.zhihu.com/p/549470099